If you’re looking for a way to “travel the world” this summer, we’ve got the perfect DIY for you and your keiki. This DIY paper mâché globe activity is a great way to entertain your keiki while also educating them and encouraging creativity and imagination.
Disclaimer: Recommended for ages 6 and over. Activity may take a few days and will get messy!
Part 1: Make the Paper Mâché
Disclaimer: This project uses flour. Please use caution if you are allergic to wheat and/or gluten.
Materials
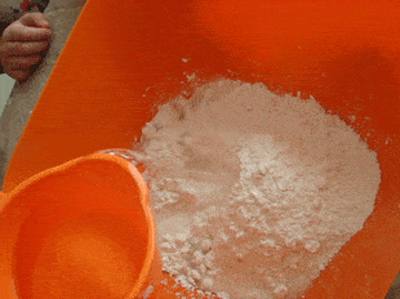
- 1-2 cups of flour
- 2-4 cups of water
- Large mixing bowl
- Cooking spoon
- Large whisk or mixer
Instructions
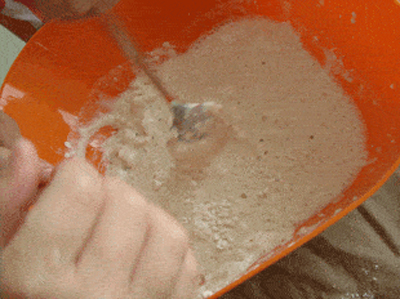
- Start by mixing 1 cup of flour with 2 cups of water.
- NOTE: Paper mâché is made with one-part flour to two-parts water. Keep this in mind as you add more of each ingredient.
- The consistency of the mixture should be like pancake batter.
- Using the whisk or cooking spoon, mix until there are no lumps.
- Once there are no lumps, add water as needed until the paper mâché is smooth and runny, like glue.
Quick Tips
- Hawaii is known for high humidity, so add a teaspoon of salt to the mixture to prevent mold growth.
- Start with small batches of mâché to ensure that you don’t waste any flour or water. The mixture is easy to create, so if you need more, make it as you go.
- Paper mâché paste can be stored in a secure and sealed container in the refrigerator for up to 3 days.
- Add a pinch of cinnamon or lavender oil for fragrance.
- If allergic to flour or gluten, be sure to use rubber gloves for the project.
Part 2: Make the Globe
Materials
- Old newspaper
- Paper mâché paste
- Large round balloon
- Recommended: Punch-ball balloon (large with rubber band attached at the end)
- Acrylic paint
- Paintbrushes
- Felt tip marker
- Cardboard boxes or old tablecloth for surface covering
Instructions
- Prepare your work surface.
- Use the cardboard boxes and/or tablecloth to cover your flat surface.
- Keep a bowl of warm water at your station to rinse your fingers as you build the globe.
- Blow up the balloon.
- To stabilize the balloon, set it on a small mixing bowl covered in plastic wrap.
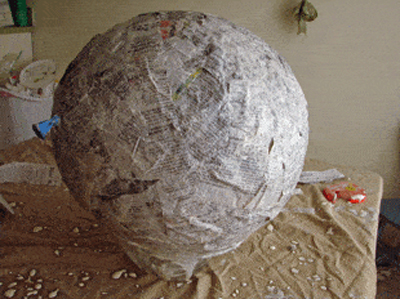
- Create paper mâché strips.
- Tear newspaper into 1” wide x 6” long strips. Prepare enough pieces to cover the balloon 3 times.
- Dip one strip at a time into the paper mache paste until it’s completely saturated.
- Squeeze off excess paste from the strip by holding it over the bowl and running your fingers over both sides.
- Cover the balloon.
- Place the newspaper strips on the balloon one at a time and smooth it out so that it is flat and there are no excess air bubbles.
- Make sure the balloon is completely covered with a full layer of newspaper strips.
- Let the first layer dry.
- Once you’ve completely covered the balloon with one layer, let it dry completely. Be patient – this process may take up to 24 hours.
- Repeat!
- Once the first layer has dried, repeat steps 3-5 to apply your second and third layers of newspaper.
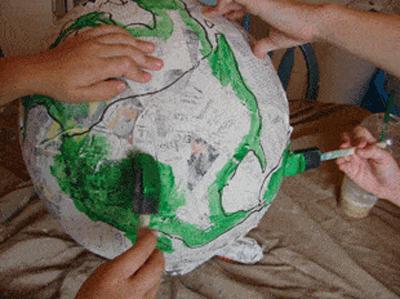
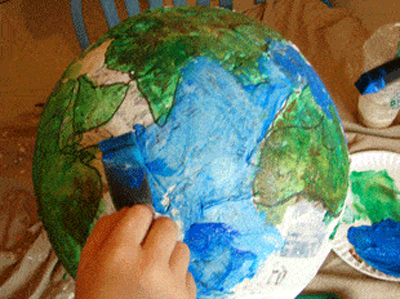
- Get creative.
- Once the last layer of paper mâché is completely dry, use acrylic paint to create the globe’s features. Get creative and add as much detail as desired!
- Tip: Draw an outline of the main land masses (continents, countries, islands) before painting to ensure accuracy.
- Once your globe is painted and labeled, let it dry and start globetrotting!
Note: Remember to dispose of any leftover paper mâché paste by placing it your rubbish bin. Never dispose of paper mâché paste in a sink, as it could clog your pipes!

Source links:
The Crafty Classroom: Paper Mache Globe Craft